NOTES:
- The Intel® Distribution of OpenVINO™ toolkit was formerly known as the Intel® Computer Vision SDK.
- These steps apply to Ubuntu*, CentOS*, and Yocto*. If you are using Intel Distribution of OpenVINO toolkit on Windows* OS, see the Installation Guide forWindows*".
- For the Intel Distribution of OpenVINO toolkit without FPGA support, see Installation Guide for Linux*.
- If you are migrating from the Intel® Computer Vision SDK 2017 R3 Beta version to the Intel Distribution of OpenVINO, read How to port your application from Intel® Computer Vision SDK 2017 R3 Beta to OpenVINO™ Toolkit article.
- CentOS and Yocto installations will require some modifications that are not covered in this guide.
- An internet connection is required to follow the steps in this guide.
Introduction
The Intel® Distribution of OpenVINO™ toolkit quickly deploys applications and solutions that emulate human vision. Based on Convolutional Neural Networks (CNN), the toolkit extends computer vision (CV) workloads across Intel® hardware, maximizing performance. The Intel Distribution of OpenVINO toolkit includes the Intel® Deep Learning Deployment Toolkit (Intel® DLDT).
The Intel Distribution of OpenVINO toolkit for Linux* with FPGA Support:
- Enables CNN-based deep learning inference on the edge
- Supports heterogeneous execution across Intel® CPU, Intel® Integrated Graphics, Intel® FPGA, Intel® Movidius™ Neural Compute Stick, and Intel® Neural Compute Stick 2
- Speeds time-to-market via an easy-to-use library of computer vision functions and pre-optimized kernels
- Includes optimized calls for computer vision standards including OpenCV*, OpenCL™, and OpenVX*
Included with the Installation and installed by default:
| Component | Description |
|---|---|
| Model Optimizer | This tool imports, converts, and optimizes models that were trained in popular frameworks to a format usable by Intel tools, especially the Inference Engine. Popular frameworks include Caffe*, TensorFlow*, MXNet*, and ONNX*. |
| Inference Engine | This is the engine that runs the deep learning model. It includes a set of libraries for an easy inference integration into your applications. |
| Drivers and runtimes for OpenCL™ version 2.1 | Enables OpenCL on the GPU/CPU for Intel® processors |
| Intel® Media SDK | Offers access to hardware accelerated video codecs and frame processing |
| Pre-compiled FPGA bitstream samples | Pre-compiled bitstream samples for the Intel® Arria® 10 GX FPGA Development Kit, Intel® Programmable Acceleration Card with Intel® Arria® 10 GX FPGA, and Intel® Vision Accelerator Design with an Intel® Arria 10 FPGA. |
| Intel® FPGA SDK for OpenCL™ software technology | The Intel® FPGA RTE for OpenCL™ provides utilities, host runtime libraries, drivers, and RTE-specific libraries and files |
| OpenCV version 3.4.2 | OpenCV* community version compiled for Intel® hardware. Includes PVL libraries for computer vision |
| OpenVX* version 1.1 | Intel's implementation of OpenVX* 1.1 optimized for running on Intel® hardware (CPU, GPU, IPU) |
| Pre-trained models | A set of Intel's pre-trained models for learning and demo purposes or to develop deep learning software. |
| Sample Applications | A set of simple console applications demonstrating how to use Intel's Deep Learning Inference Engine in your applications. Additional information about building and running the samples can be found in the Inference Engine Developer Guide. |
Development and Target Platform
The development and target platforms have the same requirements, but you can select different components during the installation, based on your intended use.
Hardware
- 6th-8th Generation Intel® Core™
- Intel® Xeon® v5 family
- Intel® Xeon® v6 family
- Intel® Pentium® processor N4200/5, N3350/5, N3450/5 with Intel® HD Graphics
- Intel® Movidius™ Neural Compute Stick
- Intel® Neural Compute Stick 2
- Intel® Arria® 10 GX FPGA Development Kit
- Intel® Programmable Acceleration Card with Intel® Arria® 10 GX FPGA
- Intel® Vision Accelerator Design with an Intel® Arria 10 FPGA
Processor Notes:
- Processor graphics are not included in all processors. See Product Specifications for information about your processor.
- A chipset that supports processor graphics is required for Intel® Xeon® processors.
Operating Systems:
- Ubuntu 16.04.x long-term support (LTS), 64-bit
- CentOS 7.4, 64-bit (requires modifications)
- Yocto Project Poky Jethro v2.0.3, 64-bit (for target only and requires modifications)
Overview
This guide provides step-by-step instructions on how to install Intel Distribution of OpenVINO toolkit with FPGA Support. This includes FPGA initialization and configuration steps. Some steps apply only for the Intel® Arria 10 GX FPGA Development Kit and are noted as such. The following steps will be covered:
- Configure the Intel® Arria® 10 GX FPGA Development Kit
- Program the Intel® Arria® 10 GX FPGA Development Kit
- Install the Intel® Distribution of OpenVINO™ Toolkit and external software dependensies
- Configure the Model Optimizer
- Complete the Intel® Arria® 10 FPGA Setup
- Run the Demos to Verify Installation and Compile Samples
- Program a Bitstream
- Run a Sample
- Use the Face Detection Tutorial
NOTE: If you have the Intel® Vision Acceleration Design with Intel® Arria® 10 FPGA please start on Step 3 Install the Intel® Distribution of OpenVINO™ Toolkit.
Installation Notes:
- For a first-time installation, use all steps.
- Use Steps 1 and 2 only after receiving a new FPGA card.
- Repeat Steps 3-6 when installing a new version of the Intel Distribution of OpenVINO toolkit.
- Use Step 7 when a Neural Network topology used by an Intel Distribution of OpenVINO application changes.
Configure Intel® Arria® 10 GX FPGA Development Kit
NOTE: The steps in the two following sections are required only for the Intel® Arria® 10 GX FPGA Development Kit. If you have the Intel® Vision Acceleration Design with Intel® Arria® 10 FPGA, please skip to Install the Intel Distribution of OpenVINO toolkit.
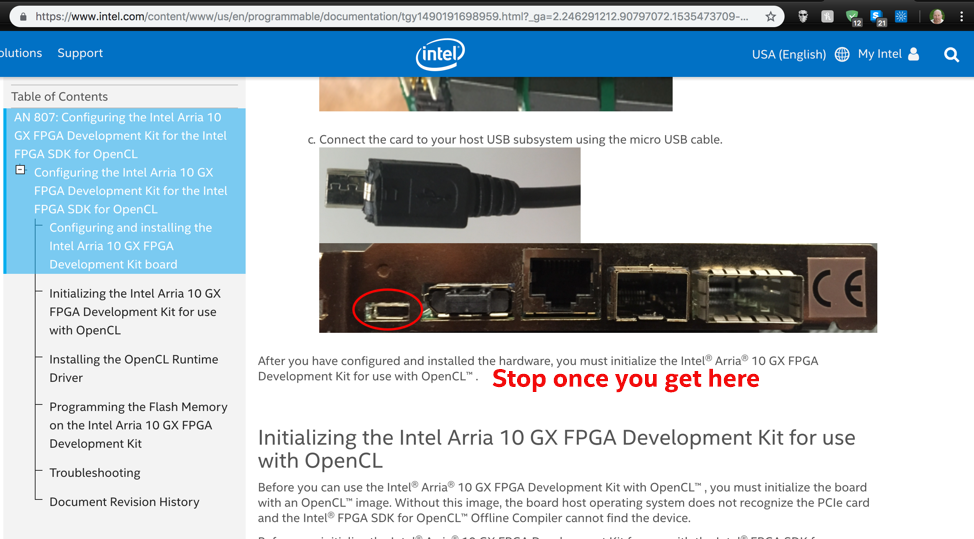
To configure the Intel® Arria® 10 GX FPGA Development Kit, use the online Guide: Configuring the Intel Arria 10 GX FPGA Development Kit for OpenCL. Stop after you configure and install the Intel Arria 10 GX FPGA Development Kit board. Do not follow the steps in the rest of the document. Instead, return to this document upon completing the specified section.
Program the Intel® Arria® 10 GX FPGA Development Kit
NOTE: You need to do this only once, after you set up the FPGA board. These steps are not necessary for the Intel® Vision Acceleration Design with Intel® Arria® 10 FPGA. If you have the Intel® Vision Acceleration Design with Intel® Arria® 10 FPGA skip to Install the Intel Distribution of OpenVINO™ toolkit.
-
Use one of the following two links to download the Intel® Quartus® software, depending on the version you want:
- If you have an Intel® Quartus® license, download QuartusProProgrammerSetup-17.1.0.240-linux. This software uses about 35 GB of disk space.

- If you do not have the license, download QuartusPrimeLiteProgrammerSetup-17.1.0.590-linux. This software uses about 1.4 GB of disk space.

- Go to the
Downloadsdirectory or the directory to which you downloaded the Intel® Quartus® package. This document assumes the software is in theDownloadsdirectory:cd ~/Downloads - Use the command for the package you downloaded:
-
Option 1: Intel® Quartus® Pro: sudo chmod +x QuartusProProgrammerSetup-17.1.0.240-linux.run
-
Option 2: Intel® Quartus® Lite: chmod +x QuartusProgrammerSetup-17.1.0.590-linux.run
-
Option 1: Intel® Quartus® Pro:
- Run the Intel® Quartus® Installer: sudo ./Quartus.<version>.run
- Click through the installer to the end. Remove the checkmarks from all boxes at the end of the installation.
By default, the software is installed under/home/user. We suggest changing this directory to/opt/alteraduring the installation. A subdirectory is created with the name dependent on your version of Intel® Quartus®:- Intel® Quartus® Pro:
/opt/altera/intelFPGA_pro/17.1 - Intel® Quartus® Lite:
/opt/altera/intelFPGA/17.1
- Intel® Quartus® Pro:
- Download
fpga_support_files.tgzfrom the Intel Registration Center. The files in this .tgz are required to ensure your FPGA card and the Intel Distribution of OpenVINO work correctly. - Go to the directory where you downloaded
fpga_support_files.tgz. - Unpack the .tgz file: A directory namedtar -xvzf fpga_support_files.tgz
fpga_support_filesis created. - Go to the
fpga_support_filesdirectory:cd fpga_support_files - Copy
setup_env.shto yourhomedirectory:cp setup_env.sh /home/<user>source /home/<user>/setup_env.sh - Configure the FPGA Driver Blacklist: sudo mv config/blacklist-altera-cvp.conf /etc/modprobe.d
- Copy the USB rules: sudo cp config/51-usbblaster.rules /etc/udev/rules.d/
- Load the USB rules: sudo udevadm control --reload-rules && udevadm trigger
- Unplug and replug the Micro-USB cable from the Intel Arria 10 GX board for JTAG.
- (OPTIONAL) Validate that the cable is connected: You should see a message similar to:lsusb | grep AlteraBus 001 Device 005: ID 09fb:6010 Altera
- Run
jtagconfig:Your output is similar to:jtagconfigUSB-BlasterII [1-14]02E660DD 10AX115H1(.|E2|ES)/10AX115H2/..020A40DD 5M(1270ZF324|2210Z)/EPM2210 - Use
jtagconfigto slow the clock:jtagconfig --setparam 1 JtagClock 6M - (OPTIONAL) Confirm the clock is set to 6M: You should see the following:jtagconfig --getparam 1 JtagClock6M
- Go to the
configdirectory:cd config - Use Intel® Quartus® software to program
top.sofandmax5_150.pof. These files are fromfpga_support_files.tgz:quartus_pgm -c 1 -m JTAG -o "p;max5_150.pof@2"quartus_pgm -c 1 -m JTAG -o "p;top.sof" - Restart your computer: reboot
- Verify you successfully programmed
top.sof:If successful, you see a message similar to:sudo lspci |grep Alt01:00.0 Processing accelerators: Altera Corporation Device 2494 (rev 01)NOTE: You will finish setting up the card after you install Intel Distribution of OpenVINO toolkit.
Install the Intel® Distribution of OpenVINO™ Toolkit Core Components
NOTE: An Internet connection is required to complete these steps.
If you do not have a copy of the Intel Distribution of OpenVINO toolkit package file, download it from Intel® Distribution of OpenVINO™ toolkit for Linux* with FPGA Support.
NOTE: You will need to select the Intel Distribution of OpenVINO toolkit for Linux* with FPGA Support package version from the dropdown.
- Open a command prompt terminal window.
- Go to the location where you downloaded the Intel Distribution of OpenVINO toolkit for Linux* with FPGA Support package file.
If you downloaded the package file to the current user'sDownloadsdirectory:By default, the file is saved ascd ~/Downloads/l_openvino_toolkit_fpga_p_<version>.tgz. - Unpack the .tgz file: The files are unpacked to thetar -xvzf l_openvino_toolkit_fpga_p_<version>.tgz
l_openvino_toolkit_fpga_p_<version>directory. -
Go to the
l_openvino_toolkit_fpga_p_<version>directory:cd l_openvino_toolkit_fpga_p_<version>If you have a previous version of the Intel Distribution of OpenVINO toolkit installed, rename or delete two directories:
/home/<user>/inference_engine_samples/home/<user>/openvino_models
Installation Notes:
- Choose an installation option and run the related script with root or regular user privileges. The default installation directory depends on the privileges you choose for the installation.
- You can use either a GUI installation wizard or command-line instructions. The only difference between the two options is that the command-line instructions are text-based. This means that instead of clicking options in a GUI, command-line prompts ask for input on a text screen.
- Screenshots are provided for the GUI, but not for CLI. If you choose CLI, you will be presented with the same choices and complete the same tasks.
- Choose your installation option:
- Option 1: GUI Installation Wizard: sudo ./install_GUI.sh
- Option 2: Command-Line Instructions: sudo ./install.sh
- Option 1: GUI Installation Wizard:
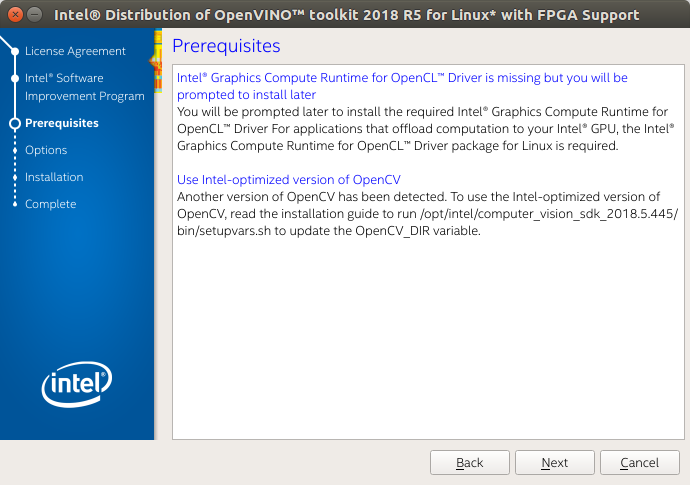
- Follow the instructions on your screen. Watch for informational messages such as the following in case you must complete additional steps:
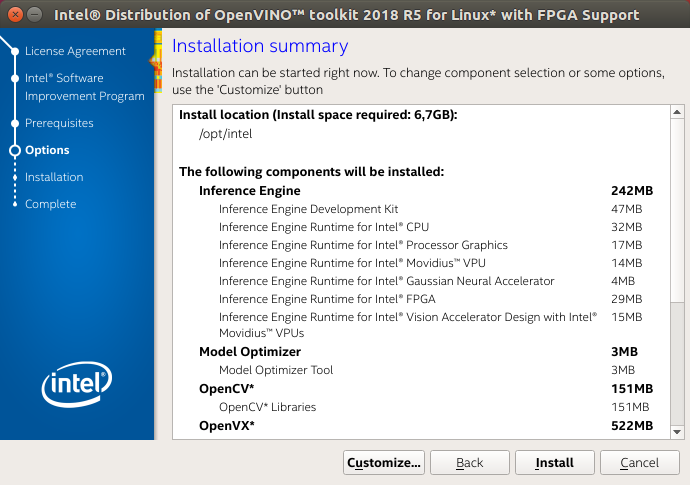
- If needed, change the components you want to install or the installation directory. Pay attention to the installation directory. You will need this information later. If you select the default options, the Installation summary GUI screen looks like this:
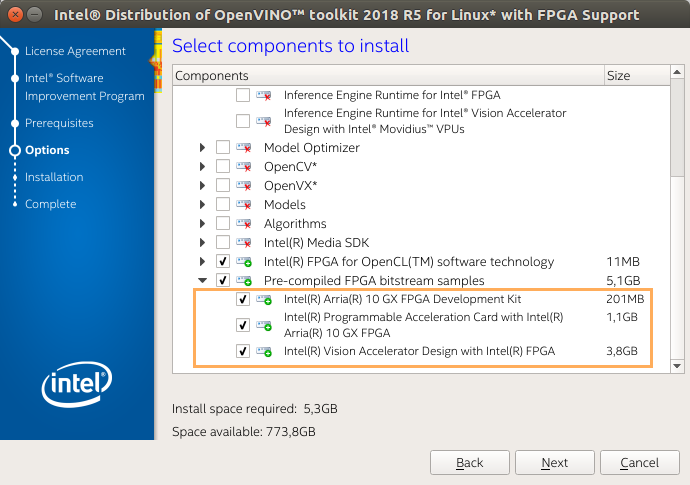
- Optional: You can choose Customize and select only the bitstreams for your card. This will allow you to minimize the size of the download by several gigabytes.
- The three bitstreams listed at the bottom of the customization screen are highlighted below. Choose the one for your FPGA:
- If you used root privileges to run the installer, it installs the Intel Distribution of OpenVINO in the
/opt/intel/computer_vision_sdk_fpga_<version>/directory.
For simplicity, a symbolic link to the latest installation is also created:/opt/intel/computer_vision_sdk/. - If you used regular user privileges to run the installer, it installs the Intel Distribution of OpenVINO in the
/home/<user>/intel/computer_vision_sdk_fpga_<version>/directory.
For simplicity, a symbolic link to the latest installation is also created:/home/<user>/intel/computer_vision_sdk/.
- A Complete screen indicates the first part of installation is done. The final screen informs you that the core components have been installed and additional steps still required:
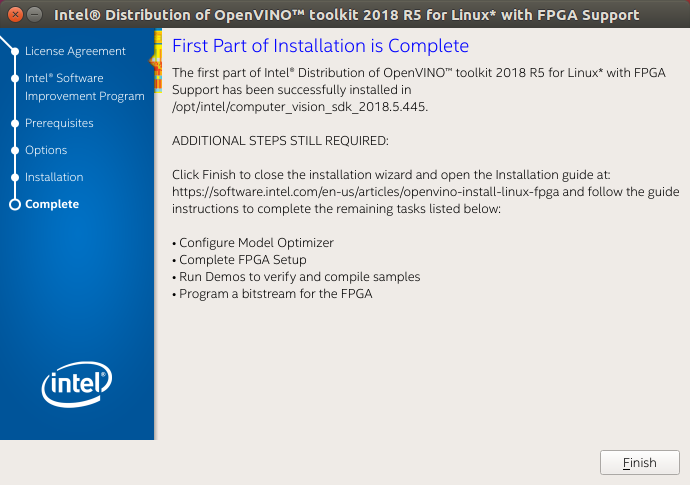
The first core components are installed. Continue to the next section to install additional dependencies.
Install External Software Dependencies
- Change to the
install_dependenciesdirectory:cd /opt/intel/computer_vision_sdk/install_dependencies - Run a script to download and install the external software dependencies: sudo -E ./install_cv_sdk_dependencies.sh
These dependencies are required for:
- Intel-optimized OpenCV 3.4
- Deep Learning Inference Engine
-
Deep Learning Model Optimizer tools
As an option, you can install all the dependencies manually instead of running
install_cv_sdk_dependencies.sh. For manual installation, use the list of dependencies from System Requirements.NOTE: The Model Optimizer has additional prerequisites that are addressed later in this document.
The dependencies are installed. Continue to the next section to configure the Model Optimizer.
Configure the Model Optimizer
The Model Optimizer is a Python*-based command line tool for importing trained models from popular deep learning frameworks such as Caffe*, TensorFlow*, Apache MXNet*, and ONNX*.
The Model Optimizer is a key component of the Intel Distribution of OpenVINO toolkit. You cannot do inference on your trained model without running the model through the Model Optimizer. When you run a pre-trained model through the Model Optimizer, your output is an Intermediate Representation (IR) of the network. The Intermediate Representation is a pair of files that describe the whole model:
-
.xml: Describes the network topology -
.bin: Contains the weights and biases binary data
For more information about the Model Optimizer, refer to the Model Optimizer Developer Guide.
Model Optimizer Configuration Steps
You can choose to either configure all supported frameworks at once, or configure one framework at a time. Choose the option that best suits your needs. If you see error messages, make sure you installed all dependencies.
NOTE: If you did not install the Intel Distribution of OpenVINO to the default install directory, replace
/opt/intel/with the directory where you installed the software.
NOTE: Configuring the Model Optimizer requires an internet connection.
Option 1: Configure all supported frameworks at the same time
- Go to the Model Optimizer prerequisites directory: cd /opt/intel/computer_vision_sdk/deployment_tools/model_optimizer/install_prerequisites
- Run the script to configure the Model Optimizer for Caffe, TensorFlow, MXNet, Kaldi*, and ONNX: sudo ./install_prerequisites.sh
Option 2: Configure each framework separately
- Go to the Model Optimizer prerequisites directory: cd /opt/intel/computer_vision_sdk/deployment_tools/model_optimizer/install_prerequisites
- Run the script for your model framework. You can run more than one script:
- For Caffe: sudo ./install_prerequisites_caffe.sh
- For TensorFlow: sudo ./install_prerequisites_tf.sh
- For MXNet: sudo ./install_prerequisites_mxnet.sh
- For ONNX: sudo ./install_prerequisites_onnx.sh
- For Kaldi: sudo ./install_prerequisites_kaldi.sh
- For Caffe:
The Model Optimizer is configured for one or more frameworks.
Complete Intel® Arria® 10 FPGA Setup
For the Intel Vision Accelerator Design with Intel Arria 10 FPGA, download the fpga_support_files archive:
- Download
fpga_support_files.tgzfrom the Intel Registration Center. The files in this <tt>.tgz are required to ensure your FPGA card and Intel Distribution of OpenVINO toolkit work correctly. Right click or save the file instead of letting your browser extract automatically. - Go to the directory where you downloaded
fpga_support_files.tgz. - Unpack the .tgz file: A directory namedtar -xvzf fpga_support_files.tgz
fpga_support_filesis created. - Go to the
fpga_support_filesdirectory:cd fpga_support_files
NOTE: These steps are for both Intel Arria 10 FPGA cards.
- Switch to superuser mode: sudo su
- Use the
setup_env.shscript fromfpga_support_files.tgzto set your environment variables:source /home/<user>/Downloads/fpga_support_files/setup_env.sh - Change directory to
/Downloads/fpga_support_files/:cd /home/<user>/Downloads/fpga_support_files/ - Run the FPGA dependencies script, which allows OpenCL to support Ubuntu and recent kernels: ./install_openvino_fpga_dependencies.sh
- When asked, select the FPGA card, Intel GPU, and Movidius Neural Compute Stick, then you can install the correct dependencies.
- If you installed the 4.14 kernel, you will need to reboot the machine and select the new kernel in the Ubuntu (grub) boot menu. You will also need to redo steps 1 and 2 to set up your environmental variables again.
- Install OpenCL devices. Enter
Ywhen prompted to install:aocl install - Reboot the machine: reboot
- Use the
setup_env.shscript fromfpga_support_files.tgzto set your environment variables:source /home/<user>/Downloads/fpga_support_files/setup_env.sh - Run
aocldiagnose:Your screen displaysaocl diagnoseDIAGNOSTIC_PASSED. - Exit superuser mode: exit
For the Intel Distribution of OpenVINO toolkit R5 with Intel® Vision Acceleration Design with Intel® Arria® 10 FPGA, continue to the next section to program the board before running the samples and programming bitstreams.
Otherwise, you completed the FPGA installation and configuration. You are ready to compile the samples by running the demo scripts.
Set Up the Intel® Vision Accelerator Design with Intel® Arria® 10 FPGA for R5
For the R5 release, the Intel® Distribution of OpenVINO™ toolkit introduced a new board support package (BSP) a10_1150_sg1 for the Intel® Vision Accelerator Design with an Intel® Arria 10 FPGA, which is included into the fpga_support_files.tgz archive. To program the bitstreams for the Intel Distribution of OpenVINO toolkit R5, you need to program the BSP into the board using the USB blaster:
NOTE: The steps below apply only for the Intel Distribution of OpenVINO toolkit R5. Otherwise, skip them to the Run the Demos to Verify Installation and Compile Samples.
- Go to the
configfolder of thefpga_support_filesdirectory where thea10_1150_sg1is located:cd /home/<user>/Downloads/fpga_support_files/config/ - Copy the
a10_1150_sg1folder to theboarddirectory:sudo cp -rf a10_1150_sg1 /opt/altera/aocl-pro-rte/aclrte-linux64/board/ - Convert the BSP files from DOS to UNIX: sudo chmod +x a10_1150_sg1find a10_1150_sg1 -type f -print0 | xargs -0 dos2unix
- Set up the USB Blaster:
- Connect the cable between the board and the host system. Use the letter codes in the diagram below for the connection points:
- Connect the B end of the cable to point B on the board.
- Connect the F end of the cable to point F on the FPGA download cable.
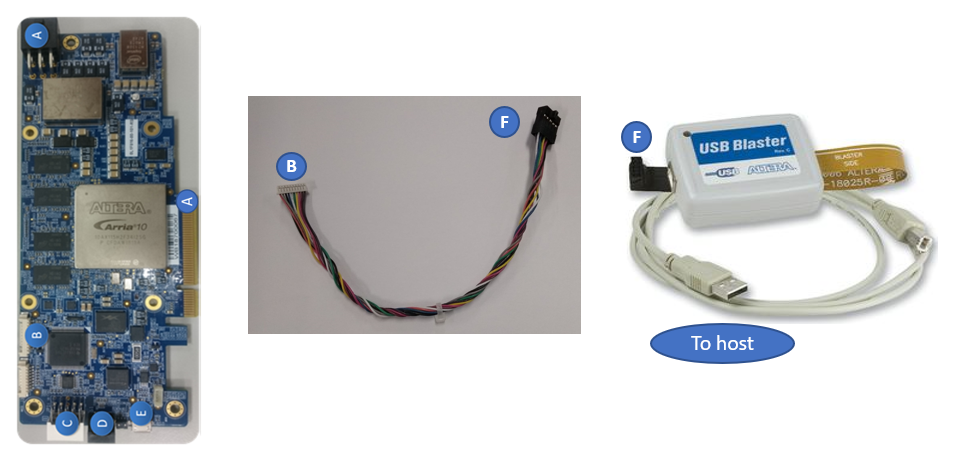 Connection from JTAG Port to Cable to Intel® FPGA Download Cable
- From point F end of the cable to point F on the FPGA download cable, the connection is as shown:
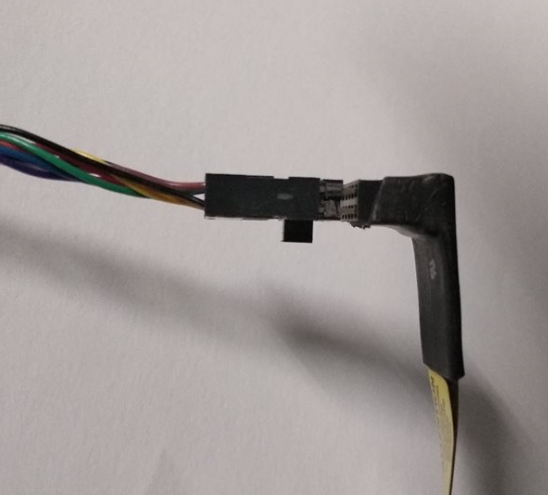 Connection from Cable to Intel® FPGA Download Cable
- Connect the cable between the board and the host system. Use the letter codes in the diagram below for the connection points:
- Source the
setup_env.shscript from thefpga_support_filesto set up the environment variables:source /home/<user>/Downloads/fpga_support_files/setup_env.sh - Update the Intel FPGA Download Cable rules to program the board without root permissions and to flash the initialization bitstreams so that the Intel FPGA Download Cable can communicate with the board: sudo cp config/51-usbblaster.rules /etc/udev/rules.d
- Load the USB rules: sudo udevadm control --reload-rules && udevadm trigger
- Unplug and re-plug the Intel® FPGA Download Cable to enable JTAG connection.
- Run
jtagconfigto ensure that your Intel FPFA Download Cable driver is ready to use:Your output is similar to:jtagconfig1) USB-Blaster [1-6]02E660DD 10AX115H1(.|E2|ES)/10AX115H2/.. - Download Quartus Prime Lite Edition 17.1. Install the Quartus Prime Lite to
/home/<user>/intelFPGA/17.1directory.NOTE: You will need the complete Quartus Prime Lite version when you want to program the
boardtest_1ddr_top.aocxinto the flash for permanent availability. - Export the Quartus Prime Lite environment variable: export QUARTUS_ROOTDIR=/home/<user>/intelFPGA/17.1/quartus
- Go to
/opt/altera/aocl-pro-rte/aclrte-linux64/board/a10_1150_sg1/bringup, whereboardtest_1ddr_top.aocxis located:cd /opt/altera/aocl-pro-rte/aclrte-linux64/board/a10_1150_sg1/bringup - Program the
boardtest_1ddr_top.aocxfile to the flash to be made permanently available even after power cycle:aocl flash acl0 boardtest_1ddr_top.aocxNOTE: You will need the USB Blaster for this.
- Reboot the host system.
- Check if the host system recognizes the Intel® Vision Accelerator Design with Intel® Arria® 10 FPGA board. Confirm you can detect the PCIe card: Your output is similar to:lspci | grep -i Altera01:00.0 Processing accelerators: Altera Corporation Device 2494 (rev 01)
- Source the
setup_env.shscript from thefpga_support_filesto setup the environment variables:source /home/<user>/Downloads/fpga_support_file/setup_env.sh - Uninstall the previous R4 BSP before installing the OpenCL drivers for the R5 BSP: aocl uninstall /opt/altera/aocl-pro-rte/aclrte-linux64/board/<R4_BSP_package>/
- Export and source the environment script: export AOCL_BOARD_PACKAGE_ROOT=/opt/altera/aocl-pro-rte/aclrte-linux64/board/a10_1150_sg1source /opt/altera/aocl-pro-rte/aclrte-linux64/init_opencl.sh
- Install OpenCL devices: aocl install
- Run the
diagnosecommand:You should seeaocl diagnoseDIAGNOSTIC_PASSEDbefore proceeding to the next steps.
Run the Demos to Verify Installation and Compile Samples
To check the installation, run the demo applications provided with the product on the CPU using the following instructions:
- Go to the Inference Engine demo directory: cd /opt/intel/computer_vision_sdk/deployment_tools/demo
-
Run the Image Classification demo script.
This demo uses the Model Optimizer to convert a SqueezeNet model to the <tt>.bin and <tt>.xml Intermediate Representation (IR) files. The Inference Engine requires this model conversion so it can use the IR as input and achieve optimum performance on Intel hardware.
This demo also builds the package sample applications../demo_squeezenet_download_convert_run.shThis demo uses the
cars.pngimage in the demo directory. When the demo completes, you will have the label and confidence for the top-10 categories: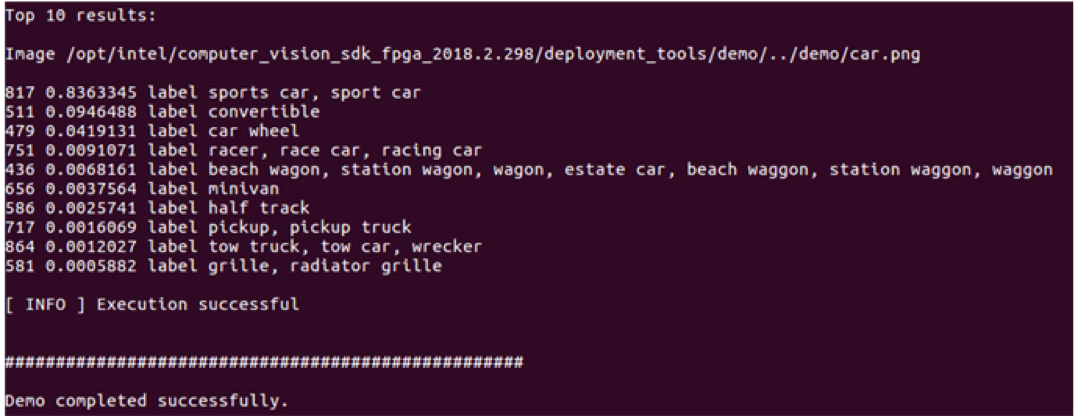
- Run the Inference Pipeline demo script: This demo uses the./demo_security_barrier_camera.sh
car.pngimage in the demo directory to show an inference pipeline using three of the pre-trained models. The demo uses vehicle recognition in which vehicle attributes build on each other to narrow in on a specific attribute.
First, an object is identified as a vehicle. This identification is used as input to the next model, which identifies specific vehicle attributes, including the license plate. Finally, the attributes identified as the license plate are used as input to the third model, which recognizes specific characters in the license plate.
This demo also builds the sample applications included in the package.
When the demo completes, you will see an image that displays the resulting frame with detections rendered as bounding boxes, and text: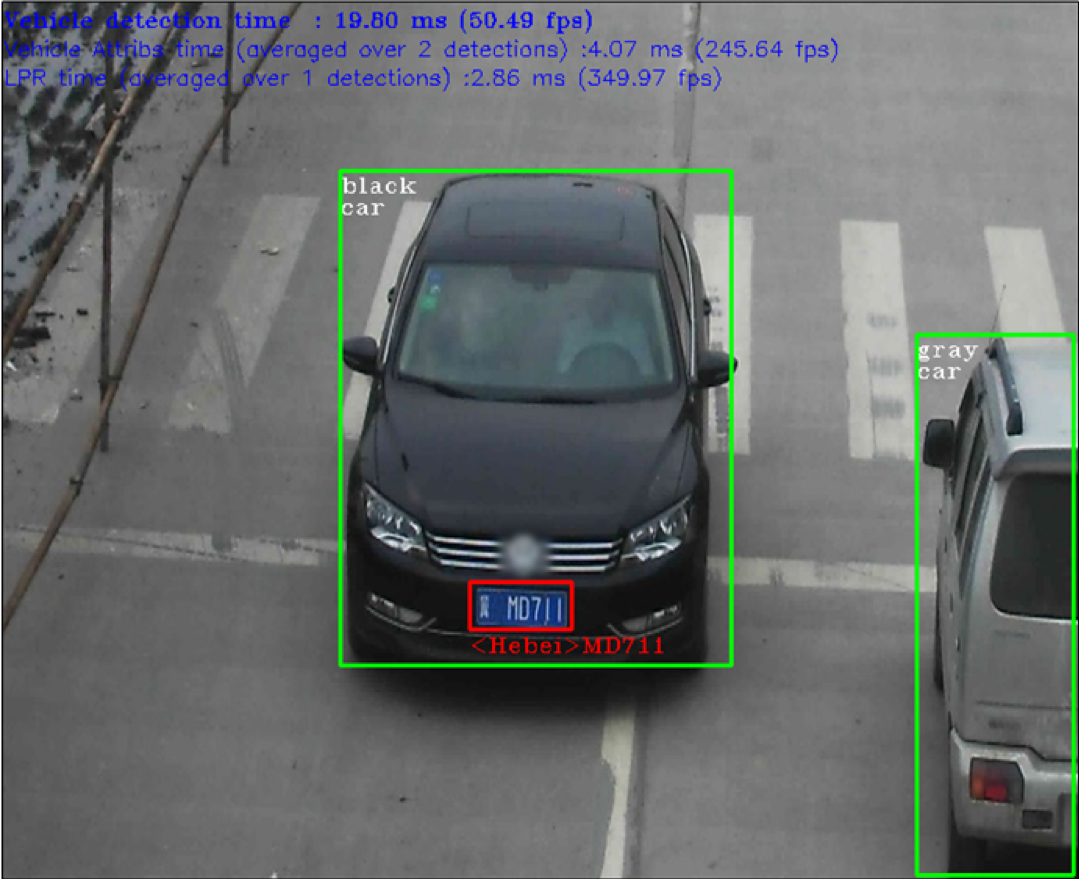
- Close the image viewer window to complete the demo.
To learn more about the demo applications, see the README.txt file in /opt/intel/computer_vision_sdk/deployment_tools/demo.
For a description of the Intel Distribution of OpenVINO pre-trained object detection and object recognition models provided with the package, go to /opt/intel/computer_vision_sdk/deployment_tools/intel_models/ and open index.html.
In this section, you saw a preview of the Intel Distribution of OpenVINO toolkit capabilities.
You have completed all the required installation, configuration, and build steps in this guide to use your CPU to work with your trained models.
NOTE: If you are migrating from the Intel® Computer Vision SDK 2017 R3 Beta version to the Intel Distribution of OpenVINO, read this information about porting your applications.
Program a Bitstream
The bitstream you program must correspond to the topology you want to deploy. In this section, you program a Squeezenet bitstream and deploy the classification sample with a Squeezenet model that you used the Model Optimizer to convert in the demo above.
IMPORTANT: Only use bitstreams from the installed version of the Intel Distribution of OpenVINO toolkit. Bitstreams from older versions of the Intel Distribution of OpenVINO toolkit are incompatible with later versions of the Intel Distribution of OpenVINO toolkit. For example, you cannot use the
1-0-1_A10DK_FP16_Genericbitstream, when the Intel Distribution of OpenVINO toolkit supports the2-0-1_A10DK_FP16_Genericbitstream.
Depending on how many bitstreams you selected, there are different folders for each FPGA card type which were downloaded in the Intel Distribution of OpenVINO package:
- For the Intel® Arria 10GX Development Kit FPGA, the pre-trained bitstreams are in
/opt/intel/computer_vision_sdk/bitstreams/a10_devkit_bitstreams. This demo uses a Squeezenet bitstream with low precision for the classification sample. - For the Intel® Vision Accelerator Design with Intel® Arria® 10 FPGA, the pre-trained bistreams are in
/opt/intel/computer_vision_sdk/bitstreams/a10_vision_design_bitstreams. This demo uses a Squeezenet bitstream with low precision for the classification sample.
To program a bitstream:
- Rerun the environment setup script: source /home/<user>/Downloads/fpga_support_files/setup_env.sh
- Go to your home directory: cd /home/<user>
- Program the bitstream using one one the following options depending on your card:
- Program the bitstream for Intel® Arria® 10 FPGA Development Kit: aocl program acl0 /opt/intel/computer_vision_sdk/a10_devkit_bitstreams/2-0-1_A10DK_FP11_SqueezeNet.aocx
- Program the bitstream for the Intel® Vision Accelerator Design with Intel® Arria® 10 FPGA: aocl program acl0 /opt/intel/computer_vision_sdk/bitstreams/a10_vision_design_bitstreams/4-0_PL1_FP11_SqueezeNet.aocx
- Program the bitstream for Intel® Arria® 10 FPGA Development Kit:
Optional Steps to Flash the FPGA Card
NOTE:
- To avoid having to reprogram the board after a power down, a bitstream will be programmed to permanent memory on the Intel® Arria® 10 GX FPGA Development Kit. This will take about 20 minutes.
- The following steps 1-5 need to be done only once for a new Intel® Arria 10 FPGA card.
- Plug in the Micro USB cable to the card and your host system.
- Run
jtagconfigto ensure that the cable is properly inserted:jtagconfig - Use
jtagconfigto slow the clock:jtagconfig --setparam 1 JtagClock 6M - Store the Intel Arria 10 FPGA Development Kit bitstream long term on the board: aocl flash acl0 /opt/intel/computer_vision_sdk/a10_devkit_bitstreams/2-0-1_A10DK_FP11_SqueezeNet.aocx
- Store the Vision Design bistream on the board: Your output is similar to:aocl flash acl0 /opt/intel/computer_vision_sdk/bitstreams/a10_vision_design_bitstreams/4-0_PL1_FP11_SqueezeNet.aocxUSB-BlasterII [1-14]02E660DD 10AX115H1(.|E2|ES)/10AX115H2/..020A40DD 5M(1270ZF324|2210Z)/EPM2210
Set Up a Neural Network Model for FPGA
In this section, you create an FP16 model suitable for hardware accelerators. For more information, see the FPGA plugin section in the Inference Engine Developer Guide.
- Create a directory for the FP16 SqueezeNet Model: mkdir /home/<user>/squeezenet1.1_FP16
- Go to
/home/<user>/squeezenet1.1_FP16:cd /home/<user>/squeezenet1.1_FP16 - Use the Model Optimizer to convert an FP16 Squeezenet Caffe model into an optimized Intermediate Representation (IR): python3 /opt/intel/computer_vision_sdk/deployment_tools/model_optimizer/mo.py --input_model /home/<user>/openvino_models/classification/squeezenet/1.1/caffe/squeezenet1.1.caffemodel --data_type FP16 --output_dir .
- The
squeezenet1.1.labelsfile contains the classes ImageNet uses. This file is included so that the inference results show text instead of classification numbers. Copysqueezenet1.1.labelsto the your optimized model location:cp /home/<user>/openvino_models/ir/squeezenet1.1/squeezenet1.1.labels . - Copy a sample image to the release directory. You will use this with your optimized model: sudo cp /opt/intel/computer_vision_sdk/deployment_tools/demo/car.png ~/inference_engine_samples/intel64/Release
Continue to the next section to run a sample application.
Run a Sample Application
- Go to the samples directory: cd /home/<user>/inference_engine_samples/intel64/Release
-
Use an Inference Engine sample to run a sample application on the CPU:
./classification_sample -i car.png -m ~/openvino_models/ir/squeezenet1.1/squeezenet1.1.xmlNOTE: The CPU throughput is measured in Frames Per Second (FPS). This tells you how quickly the inference is done on the hardware.
Now run the inference using the FPGA.
- Add the
-doption to target the FPGA:You will see the throughput on FPGA, but it may show a lower FPS. This is due to the initialization time. To account for that, the next step increases the iterations to get a better sense of the speed the FPGA can run inference at../classification_sample -i car.png -m ~/squeezenet1.1_FP16/squeezenet1.1.xml -d HETERO:FPGA,CPU - Use the
-nioption to increase the number of iterations. This option reduces the initialization impact:./classification_sample -i car.png -m ~/squeezenet1.1_FP16/squeezenet1.1.xml -d HETERO:FPGA,CPU -ni 100
You have finished the Intel Distribution of OpenVINO installation for FPGA. To learn more about how OpenVINO works, refer to the Hello World tutorial and other resources provided below.
Hello World Face Detection Tutorial
Use the OpenVINO with FPGA Hello World Face Detection Exercise to learn more about how the software and hardware work together.
Additional Resources
- Intel® Distribution of OpenVINO™ toolkit home page: https://software.intel.com/en-us/openvino-toolkit
- Intel® Distribution of OpenVINO™ toolkit online documentation: https://software.intel.com/en-us/openvino-toolkit/documentation/featured
- Inference Engine FPGA plugin documentation