NOTE: For previous versions, see Configuration Guide for OpenVINO 2019R3, Configuration Guide for OpenVINO 2019R1, Configuration Guide for OpenVINO 2018R5.
1. Configure and Set Up the Intel® Vision Accelerator Design with an Intel® Arria® 10 FPGA
- Download Intel® Quartus® Prime Programmer and Tools Standard Edition 18.1. Install the Intel® Quartus® Prime Programmer and Tools Software to the
/home/<user>/intelFPGA/18.1directory. Download the fpga_install.sh script to the
/home/<user>directory.a. Switch to superuser:
sudo sub. Based on the board speed grade you have (SG1 or SG2), use the
fpga_install.shscript from/home/<user>to install your FPGA card (default is SG2).source /home/<user>/fpga_install.sh -b <#>c. To know more about the fpga_install options, invoke the script with
-hcommand.source /home/<user>/fpga_install.sh -hd. Follow the
fpga_install.shscript prompts to finish installing your FPGA card.e. After reboot launch the script again with same options as in step 2.b.
f. The
fpga_install.shscript creates an initialization script/home/<user>/init_openvino.shthat should be used to setup proper environment variables.g. To test if FPGA card was installed succesfully run
aocl diagnose:aocl diagnoseYou should see
DIAGNOSTIC_PASSEDbefore proceeding to the next steps.h. If you prefer to install the FPGA card manually, follow the steps 3-17 in this section and Steps to Flash the FPGA Card, otherwise you can skip to "Program a Bitstream".
Check if /etc/udev/rules.d/51-usbblaster.rules file exists and content matches with 3.b, if it does skip to next step.
a. Switch to superuser:
sudo sub. Create a file named /etc/udev/rules.d/51-usbblaster.rules and add the following lines to it (Red Hat Enterprise 5 and above):
# Intel FPGA Download CableSUBSYSTEM=="usb", ATTR{idVendor}=="09fb", ATTR{idProduct}=="6001", MODE="0666"SUBSYSTEM=="usb", ATTR{idVendor}=="09fb", ATTR{idProduct}=="6002", MODE="0666"SUBSYSTEM=="usb", ATTR{idVendor}=="09fb", ATTR{idProduct}=="6003", MODE="0666"# Intel FPGA Download Cable IISUBSYSTEM=="usb", ATTR{idVendor}=="09fb", ATTR{idProduct}=="6010", MODE="0666"SUBSYSTEM=="usb", ATTR{idVendor}=="09fb", ATTR{idProduct}=="6810", MODE="0666"CAUTION: Do not add extra line breaks to the .rules file.
c. Reload udev rules without reboot:
udevadm control --reload-rulesudevadm triggerd. You can exit superuser if you wish.
- Unpack the BSP for your appropriate Intel® Vision Accelerator Design with an Intel® Arria® 10 FPGA SG1 or SG2:
NOTE: If you installed OpenVINO™ as root you will need to switch to superuser
cd /opt/intel/openvino/bitstreams/a10_vision_design_sg<#>_bitstreams/BSP/sudo sutar -xvzf a10_1150_sg<#>_r4.tgzchmod -R 755 /opt/intel/openvino/bitstreams/a10_vision_design_sg<#>_bitstreamsNOTE: If you do not know which version of the board you have, please refer to the product label on the fan cover side or by the product SKU: Mustang-F100-A10-R10 => SG1; Mustang-F100-A10E-R10 => SG2
- Create an initialization script
/home/<user>/init_openvino.shwith the following content that can be run upon opening a new terminal or rebooting. This will setup your proper environment variables.export IOCL_BOARD_PACKAGE_ROOT=/opt/intel/openvino/bitstreams/a10_vision_design_sg<#>_bitstreams/BSP/a10_1150_sg<#>export AOCL_BOARD_PACKAGE_ROOT=/opt/intel/openvino/bitstreams/a10_vision_design_sg<#>_bitstreams/BSP/a10_1150_sg<#>export QUARTUS_DIR=/home/<user>/intelFPGA/18.1/qprogrammerexport QUARTUS_ROOTDIR=/home/<user>/intelFPGA/18.1/qprogrammerexport INTELFPGAOCLSDKROOT=/opt/altera/aocl-pro-rte/aclrte-linux64source $INTELFPGAOCLSDKROOT/init_opencl.shexport PATH=$PATH:$INTELFPGAOCLSDKROOT/host/linux64/bin:$QUARTUS_ROOTDIR/binexport CL_CONTEXT_COMPILER_MODE_INTELFPGA=3source /opt/intel/openvino/bin/setupvars.sh - Source the script. (This assumes you already have installed the Intel® FPGA Runtime Environment for OpenCL Linux x86-64 Pro Edition 19.1) source /home/<user>/init_openvino.sh
- Uninstall any previous BSP before installing the OpenCL BSP for the 2020.1 BSP. Enter Y when prompted to uninstall (Enter sudo credentials when prompted): aocl uninstall
- Install the new BSP. Enter Y when prompted to install (Enter sudo credentials when prompted): aocl install
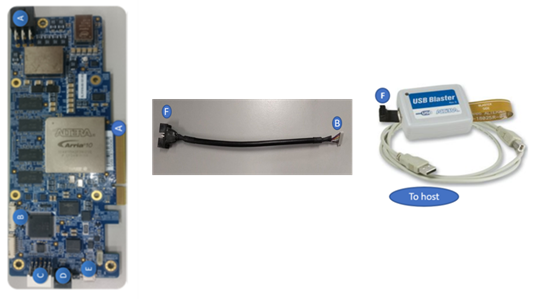
- Set up the USB Blaster:
- Connect the cable between the board and the host system. Use the letter codes in the diagram below for the connection points:
- Connect the B end of the cable to point B on the board.
- Connect the F end of the cable to point F on the FPGA download cable.
- From point F end of the cable to point F on the FPGA download cable, the connection is as shown:
- Run
jtagconfigto ensure that your Intel FPGA Download Cable driver is ready to use:Your output is similar to:jtagconfigor:1) USB-Blaster [1-6]02E660DD 10AX115H1(.|E2|ES)/10AX115H2/..1) USB-BlasterII [3-3]02E660DD 10AX115H1(.|E2|ES)/10AX115H2/.. - Use
jtagconfigto slow the clock. The message "No parameter named JtagClock" can be safely ignored.jtagconfig --setparam 1 JtagClock 6M - (OPTIONAL) Confirm the clock is set to 6M: You should see the following:jtagconfig --getparam 1 JtagClock6M
- Go to
/opt/intel/openvino/bitstreams/a10_vision_design_sg<#>_bitstreams/BSP/a10_1150_sg<#>/bringup, wheresg<#>_boardtest_2ddr_base.sofis located:cd /opt/intel/openvino/bitstreams/a10_vision_design_sg<#>_bitstreams/BSP/a10_1150_sg<#>/bringup - Program the new sof file to the board: quartus_pgm -c 1 -m JTAG -o "p;sg<#>_boardtest_2ddr_base.sof"
- Soft reboot: reboot
- Source the environment variable script you made. source /home/<user>/init_openvino.sh
- Run
aocl diagnose:Your screen displaysaocl diagnoseDIAGNOSTIC_PASSED.
NOTE: at this point if you do not want to flash the FPGA Card you can go to "Program a Bitstream"
Steps to Flash the FPGA Card
NOTE:
- To avoid having to reprogram the board after a power down, a bitstream will be programmed to permanent memory on the Intel® Vision Accelerator Design with Intel® Arria® 10 FPGA. This will take about 20 minutes.
- The steps can be followed below in this guide to do this.
- Use
jtagconfigto slow the clock. The message "No parameter named JtagClock" can be safely ignored.jtagconfig --setparam 1 JtagClock 6M - Check if $QUARTUS_ROOTDIR/linux64/perl/bin exists ls $QUARTUS_ROOTDIR/linux64/perl/bin
- If you see message "ls: cannot access /home/<user>/intelFPGA/18.1/qprogrammer/linux64/perl/bin: No such file or directory" create perl/bin directory and a symbolic link to perl mkdir -p $QUARTUS_ROOTDIR/linux64/perl/binln -s /usr/bin/perl $QUARTUS_ROOTDIR/linux64/perl/bin/perl
- If you see message "perl" go to the next step
- Go to
/opt/intel/openvino/bitstreams/a10_vision_design_sg<#>_bitstreams/BSP/a10_1150_sg<#>/bringup, wheresg<#>_boardtest_2ddr_top.aocxis located:cd /opt/intel/openvino/bitstreams/a10_vision_design_sg<#>_bitstreams/BSP/a10_1150_sg<#>/bringup - Program the
sg<#>_boardtest_2ddr_top.aocxfile to the flash to be made permanently available even after power cycle:sudo suaocl flash acl0 sg<#>_boardtest_2ddr_top.aocxNOTE: You will need the USB Blaster for this.
- Hard reboot the host system including powering off.
- Source the environment variable script you made. source /home/<user>/init_openvino.sh
- Check if the host system recognizes the Intel® Vision Accelerator Design with Intel® Arria® 10 FPGA board. Confirm you can detect the PCIe card: Your output is similar to:lspci | grep -i Altera01:00.0 Processing accelerators: Altera Corporation Device 2494 (rev 01)
- Run
aocl diagnose:You should seeaocl diagnoseDIAGNOSTIC_PASSEDbefore proceeding to the next steps.
2. Program a Bitstream
The bitstream you program should correspond to the topology you want to deploy. In this section, you program a SqueezeNet bitstream and deploy the classification sample with a SqueezeNet model that you used the Model Optimizer to convert in the steps before.
IMPORTANT: Only use bitstreams from the installed version of the Intel® Distribution of OpenVINO™ toolkit. Bitstreams from older versions of the Intel® Distribution of OpenVINO™ toolkit are incompatible with later versions of the Intel® Distribution of OpenVINO™ toolkit. For example, you cannot use the
2019R3_PV_PL<#>_FP11_AlexNet_GoogleNet_Genericbitstream, when the Intel® Distribution of OpenVINO™ toolkit supports the2019R4_PL<#>_FP11_AlexNet_GoogleNet_Genericbitstream.
Depending on how many bitstreams you selected, there are different folders for each FPGA card type which were downloaded in the Intel® Distribution of OpenVINO™ toolkit package:
- For the Intel® Vision Accelerator Design with Intel® Arria® 10 FPGA SG1 or SG2, the pre-trained bistreams are in
/opt/intel/openvino/bitstreams/a10_vision_design_sg<#>_bitstreams/. This example uses a SqueezeNet bitstream with low precision for the classification sample. - Source the environment variable script you made. source /home/<user>/init_openvino.sh
- Change to your home directory: cd /home/<user>
- Program the bitstream for the Intel® Vision Accelerator Design with Intel® Arria® 10 FPGA SG1 or SG2: aocl program acl0 /opt/intel/openvino/bitstreams/a10_vision_design_sg<#>_bitstreams/2019R4_PL<#>_FP16_InceptionV1_SqueezeNet_VGG_YoloV3.aocx
3. Setup a Neural Network Model for FPGA
In this section, you will create an FP16 model suitable for hardware accelerators. For more information, see the FPGA plugin section in the Inference Engine Developer Guide.
- Create a directory for the FP16 SqueezeNet Model: mkdir ~/squeezenet1.1_FP16
- Go to
~/squeezenet1.1_FP16:cd ~/squeezenet1.1_FP16 - Use the Model Optimizer to convert the FP32 SqueezeNet Caffe* model into an FP16 optimized Intermediate Representation (IR). The model files were downloaded when you ran the the Image Classification verification script while installing the Intel® Distribution of OpenVINO™ toolkit for Linux* with FPGA Support. To convert, run the Model Optimizer script with the following arguments: python3 /opt/intel/openvino/deployment_tools/model_optimizer/mo.py --input_model ~/openvino_models/models/public/squeezenet1.1/squeezenet1.1.caffemodel --data_type FP16 --output_dir .
- The
squeezenet1.1.labelsfile contains the classesImageNetuses. This file is included so that the inference results show text instead of classification numbers. Copysqueezenet1.1.labelsto the your optimized model location:cp ~/openvino_models/ir/public/squeezenet1.1/FP16/squeezenet1.1.labels . - Copy a sample image to the release directory. You will use this with your optimized model: cp /opt/intel/openvino/deployment_tools/demo/car.png ~/inference_engine_samples_build/intel64/Release
4. Run a Sample Application
- Go to the samples directory cd ~/inference_engine_samples_build/intel64/Release
- Use an Inference Engine sample to run a sample application on the CPU: Note the CPU throughput in Frames Per Second (FPS). This tells you how quickly the inference is done on the hardware. Now run the inference using the FPGA../classification_sample_async -i car.png -m ~/openvino_models/ir/public/squeezenet1.1/FP16/squeezenet1.1.xml
- Add the
-doption to target the FPGA:The throughput on FPGA is listed and may show a lower FPS. This may be due to the initialization time. To account for that, increase the number of iterations or batch size when deploying to get a better sense of the speed the FPGA can run inference at../classification_sample_async -i car.png -m ~/openvino_models/ir/public/squeezenet1.1/FP16/squeezenet1.1.xml -d HETERO:FPGA,CPU
Congratulations, you are done with the Intel® Distribution of OpenVINO™ toolkit installation for FPGA. To learn more about how the Intel® Distribution of OpenVINO™ toolkit works, the Hello World tutorial and are other resources are provided below.
Hello World Face Detection Tutorial
Use the Intel® Distribution of OpenVINO™ toolkit with FPGA Hello World Face Detection Exercise to learn more about how the software and hardware work together.
Additional Resources
Intel® Distribution of OpenVINO™ toolkit home page: https://software.intel.com/en-us/openvino-toolkit
Intel® Distribution of OpenVINO™ toolkit documentation: https://docs.openvinotoolkit.org/
Inference Engine FPGA plugin documentation: https://docs.openvinotoolkit.org/latest/_docs_IE_DG_supported_plugins_FPGA.html